I’ll be honest, I haven’t really been taking construction pictures like I normally at least try to. This has been without a doubt the most time-consuming, daunting thing I’ve ever made. Which is appropriate, for my wedding gown. And it’s not like I haven’t enjoyed it, although now all I have left is sewing eyelets and hemming (by hand, no less), both of which I loathe.
So, in other words, this will probably end up being a super long rambly post without many pictures.
The first thing I made was my cape. Now, I know what you’re probably thinking– a cape? Huh? But here’s the thing: I tried on exactly one veil, and hated it. Hated it. Like, had a visceral reaction to it. I don’t know, it just felt all sorts of wrong for me. But I do love the flowing lines of a veil, and I did want that, and I love cloaks so… that turned into me deciding to wear a bridal cape, made from the same chiffon that forms the top layer of my gown skirt. The basic design, honestly, came from Elsa in Frozen’s cape, of all things. Basically some very long triangular gores starting at the shoulders and shaped into an oval train. I shot for a length of roughly 75″ in the center back. Here’s my mockup.

One of these days I’ll get an actual camera that takes good pictures
Looks good, right? Well… Originally I was going to make a yoke to go over my shoulders and around my neck, like Elsa’s coronation cape, but I decided against that. So it got redesigned a bit. Once I was happy with it, I cut out the chiffon, basted the panels together,

…and it wasn’t nearly long enough. Sigh. So I cut down the center and added another, longer gore.

Now we were getting somewhere! For construction, I had to hand sew this entire frickin’ thing because it puckered horribly if it came anywhere near my sewing machine, no matter what tension or needles I used. So I hand-sewed all four seams with French seams, which meant I did each one twice. It was tedious, to say the least. Fortunately, the seams rally won’t have any stress on them, so I only needed to use a running stitch, not the considerably-more-time-and-thread-consuming backstitch.
And then there was the hemming. My original plan was to use the rolled-hem foot for my sewing machine. Here is where, I think, wedding stress has gotten to me the most of this entire project, because after half an hour of trying to get the dang thing to work, I ended up calling my mom sobbing that this was the worst idea ever and I’d never get it done. She reassured me and told me “Just take it to a tailor!” So I did. They looked at me a bit weird when I asked them please just sew a narrow hem around the whole thing, it’s a cape, but it turned out looking excellent. I don’t have pictures of this, but I sewed a couple strands of pearls across the front to look like a closure and have two gold Celtic knot brooches to pin it to the gown’s shoulder straps.
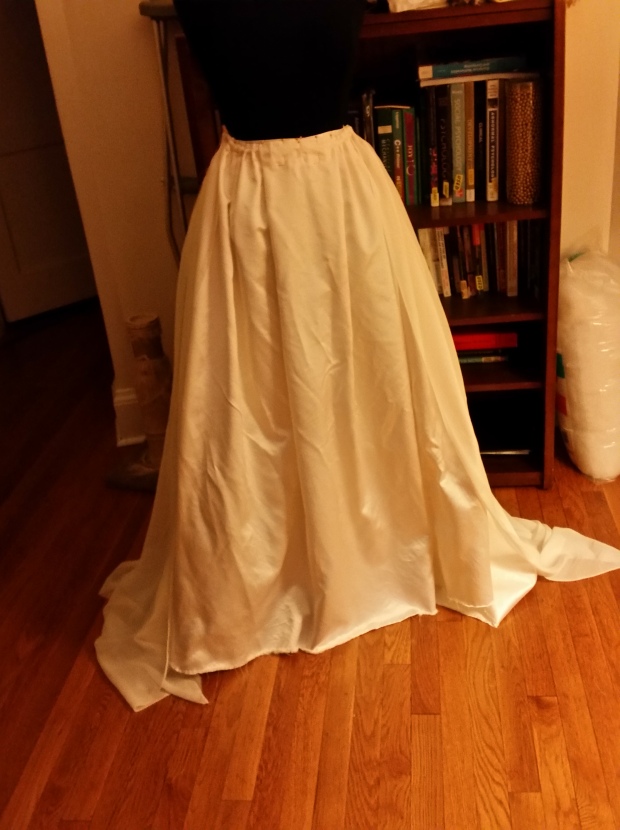
With my horrible monster that is chiffon safely ensconced in the arms of those who hem a lot more than I do, I moved on to the gown itself. You can actually see my skirt mockup in the cape pictures above; I had a limited amount of silk sating to work with and I wanted to make sure three panels would be enough fabric to get the gathers/pleats I wanted. It actually worked out perfectly! The satin was 55″ wide and I had bought 6 yards (216″) of it. For the construction, I decided to do it the period way and cut it so that the selvage-to-selvage was the width of each panel, and then each panel could be a different length. I highly recommend this method of construction, even though it involves more seams than my normal take one whole length, sew cut sides together and gather approach for a bunch of reasons:
- It makes the nap of the satin lie correctly– up and down rather than side to side. This makes a hugely noticeable difference in the sheen, especially for one like this that has a beautiful lustrous quality to it (ah, the beauty of real silk).
- It means your seams are selvage to selvage, which means you don’t have to finish them if your selvage is nice! This was awesome, no French seams!
- It makes it really easy to have a train, since you just make your back panels longer than your front panels. If I had cut it so the selvage width was the length of the skirt, not only would my train have been shorter, but it also would have wasted a good ten inches of fabric in the front.
So, in short, will always be making my gathered skirts like this in the future. I ended up going with one 45″ long panel in the front and two 60″ long panels in the side backs, with a seam down the center back, where the gown laces. For the chiffon, which was 45″ wide, I went with three 60″ long panels, which were attached 15″ from the center front of the satin (this later got pleated down to 10″).
Oh! I forgot to mention that before I did all of this, I very carefully hand washed all six yards of satin, as I washed a test scrap and noticed it came out with a much softer hand and an even more gorgeous sheen. The bolt I got it from was very stuff and had lots of weird wrinkles in it that wouldn’t come out. Washing fixed all of that, although I was paranoid throughout I was ruining my beautiful silk. I followed the instructions from here.
Anyway, I seamed my panels together, then sewed a narrow seam right sides together at the top of the chiffon and satin, to finish the top edge, then flipped them right sides out, folded over the top two inches, and began marking for cartridge pleating, which was very time consuming and tedious. I ended up with three rows of stitching, each stitch one half inch long and one half inch between rows.
I am so proud of my beautiful cartridge pleating. I’ve been too lazy to do it in the past, just gathering instead, but there is such a difference! I then fiddled around with the front, chiffon-less part of the skirt until I was satisfied with the pleats. I ended up with one big box pleat in the center, then several little knife pleats on either side.
Pleats pinned, I didn’t take a picture after they were sewn and ironed
And that was it for the skirt, except hemming, which I still have yet to do (*bites nails*). So onto the vastly more intimidating bodice I went.
I say it was vastly intimidating, but it really wasn’t unfamiliar construction to me. It’s just, you know, this is my wedding dress. It’s important to me that it’s perfect. But I digress.
I had a friend (she of the waterbender costume) help me drape a rough pattern on my torso, which I used to adapt an 18th century stays pattern. For the base layer, two layers of heavy white linen, I followed the stays diagram pretty closely, although I removed the tabs and brought in the straps, as they were closer to off-the-shoulder than I wanted. I also used the boning pattern from the stays, since I basically wanted the bodice to act as a set of stays. I considered making a separate pair of stays for a while, but decided I wanted as few layers as possible to put on on my wedding day, and the removal of the tabs didn’t make it uncomfortable.


The last picture is with the boning channels drawn in, which I then sewed and boned with 1/4″ plastic zip ties, which have always worked fabulously for me in the past. They’re very similar in tensile strength and flexibility to whalebone, supposedly, which is the period material. And it makes for very comfortable boning! Since I made this tailored to my figure, I didn’t have to deal with the boning digging into my very short waist, which I nearly always do when buying off-the-rack items. It was hugely exciting when I tried it on after boning it and basting the edges together and found it fit perfectly the first time and was comfortable to boot. Go bespoke tailoring! I sewed on the skirt and tried it on for some selfies.

Look at that fit! With my arms not awkwardly holding the phone, there’s no gapping or wrinkling!
Here’s where I kind of stopped taking pictures. Remember that really pretty silver laces I was originally going to use on the bodice? Yeah… well… something better came along. My wonderful mother offered up her dress to use! She felt it was going to waste just sitting in her closet so she sent it to me to see if I wanted to use it. As it turned out, I really, really did. Her dress was this really beautiful modern (for the early 90s) take on the late Victorian era by way of the 1920s, so it was all lace over a slip, with a high collar, dolman sleeves, and a short train. She also had a veil with really lovely rose lace trim on it that I plan to use on the skirt.
Anyway, the lace that formed the body of the dress was exactly the right ivory to go with the satin and chiffon, so I ended up using it instead of the silver lace. I’m really happy I did, especially because that means I’ve been able to repurpose a lot of the various trims and decorations as well!

Lace and satin pieces pinned to my dress form, with trim pinned to the skirt
I very carefully cut out my silk and lace pieces, which were different from the linen base layer. I love the curved back seams seen on period robes l’anglaise and wanted to include those, although they typically didn’t lace down the back, so the back is two side pieces, two middle back pieces, and a center back piece where the eyelets go, for a total of three pieces per side, then the front/side piece as seen in the above picture pinned to my dressform. I sewed all the pieces together then began whipstitching it onto the linen, which took a while to make sure it laid smoothly. Fortunately, lace covers any sins I may have made, and it looks great! I was worried about it not being pulled taut enough in some places, but it turns out when it’s worn and laced, everything is satisfyingly smooth. I also added small lace trim as a teeny peplum over the chiffon portion of the skirt and at the neckline, so it just peeks out. I adore it, even though you can’t actually see the little details like that in the picture I took of me wearing it.

Said picture.
Ah! I forgot to mention! I have zero pictures of this, but I made a petticoat out of the same linen I made the boning layers, following this tutorial. It helps add some body to the skirt. I initially made a bum support as well in true 18th century style, but decided my bum really didn’t need any extra support (it is rather prominent as is :P) and I like the dress just fine without it, as the cartridge pleating gives it the spring away from the hips I like. I make add a ruffle of tulle to the bottom of the petticoat eventually; we’ll see.
Right now I have 16/28 eyelets left to embroider (can’t even tell you how many times I’ve pricked my fingers with my very sharp embroidery needle doing this) and then on to the massive hem! 165 inches of handsewn, organza-faced hem here I come! Then I have to figure out how I want to hem the chiffon, then trim it. But that’s for another post.
Hope you enjoyed it, despite my long and rambly nature!


